Tuesday, December 30, 2014

1950 Gibson ES-140 Restoration

So I found this guitar at the Folk Store in Kansas City, and thought it was really cool. A 1950 Gibson ES-140, which is a 3/4 size archtop electric. It had a broken neck with a bad repair job, the finish was rough, tuners shot, pickguard damaged, but the electronics were still good.

"I"LL TAKE IT!"


I guess the repair worked even if it wasn't pretty. I'll have to make a new neck. This one is beyond repair.


I got the neck out and then decided I wanted to replace the plywood back and top with solid carved spruce and maple. So, off with the back!


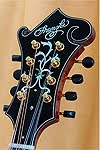
I copied the peghead exactly... sort of.
The original had a screen printed logo, but I painted mine. Oh, and I added an inlay to make it look like it's full-sized brother, the ES-175.


I might as well inlay the fretboard to go with the 175 theme. I cut all the pearl by hand. 


I used the original fretboard, filled in the dots, inlayed the pearl and repaired the worn areas.


I used solid Engelmann spruce for the top and hand carved it to shape. 


Solid maple back.


I glued in the tone bars just like the original top.


Here are some details


I sanded the sides down to the bare wood and used cream colored binding to match the faded color of the original


Finished!! One of a kind, solid carved spruce top and solid carved flamed maple back, The sides are still original, as well as the fretboard, electronics, tailpiece and pickguard bracket.
I made a new pickguard and bridge, and replaced the tuners, and had the tailpiece bracket re-plated.


After spraying the lacquer, I noticed the painted logo was dissolving, so I repainted with different paints, and it still wasn't holding up, so I decided to cut the logo out of gold Mother-of-Pearl and inlay it. Now back to finishing.


I replaced the tuners with repro Kluson tuners that are nearly identical to the original ones.


Friday, September 5, 2014

Custom Inlay for an Upright Bass Tailpiece

 The owner always wanted an ebony tailpiece to match the fingerboard, and decided to have it custom inlayed while she was at it.

From THIS:

To THIS:

Here's how I did it: I created the design to fit the shape of the piece and to represent a tree with roots which were symbolic to the owner. I didn't want to make it a realistic tree, just to suggest it and create an overlapping, interwoven design. Once the design was complete I printed it out, cut out all the pieces and glued them to the Abalone shell and reconstituted stone pieces


I hand cut each piece using a jeweler's saw and glued them to a piece of black paper using thinned white glue to keep them in place.

I also cut the printed design out of a piece of white paper and glued it to the tailpiece to give me a very clear edge to rout to.


After routing out the channel with a Dremel, I used water to loosen the glue and remove the cut pieces from the black paper.

Then I fit each piece into place.

Since I am inlaying thin flat, rigid pieces into a curved form, I had to cut them at strategic places and bevel the edge, so that when I sanded the curve, the inlays would be down in the channel.

The final piece was my "F" script logo, also hand cut.

After filling, sanding and polishing, it looks like this:


As a final touch, she wanted a moon and stars on the bottom of the fingerboard, representing her and her four grandchildren.


Saturday, April 26, 2014

Custom Inlay

I had a request to create a design of a bee inlaid into the end of a mandolin fretboard. I first created a digital sketch to show what I had in mind.

I cut the pieces from white and gold mother-of-pearl, Paua abalone and square sterling silver wire.

I removed the last few frets and "scooped" the fretboard end per the client's request. I printed out the design, cut it out and glued it to the fretboard so I could easily see where I needed to rout.

 I cut a thin piece of plywood to lay over the end of the scooped out fretboard end so I'd have a level surface to support the router and control the depth of the cut.

After the cavity has been routed out, I began laying in the tiny pieces of shell and wire.

Then I filled the space between the wire lines and the original fret slots and sanded it flush. Just the right amount of whimsy.

Saturday, February 1, 2014

Dog Boys


I love when I get a chance to do something a little different. The client, from Nova Scotia, ordered two mandolins, an A-5 and an A-4. He wanted the designs to pay tribute to his two dogs and to Canada. One of the dogs was a Scottie, the other a mix breed.


The quilted maple backs for both mandolins came from the same piece of wood.


I cut out the tiny scotties by hand. I decided to add three more, so I had to cut two more even smaller


For the A-4, I decided to use paw prints rather than try and I wanted them to wlak up the fretboard instead of centered. Each little paw print is made of 5 separate pieces of hand-cut mother-of-pearl. 45 tiny pieces. I cut several more because I knew I would drop a few, never to be found. Surprisingly I only dropped two, and I found one of them. 


Unfinished, strung up to test the feel and make any adjustments.


The dovetail neck joint.


The guts.


A Canadian maple leaf, cut from abalone. I love these Golden Era tuning machines from Stewart MacDonald. Relic brass finish with black knobs.


A pack of  wild dogs