Sunday, September 9, 2012

1907 Orpheum #3 Banjo Finished

It's all finished and assembled. One of the most interesting restorations I've ever gotten to work on. I love the intricate design and all the details from the ornate inlays to the multiple piece dowel stick.

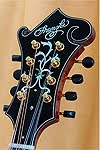
The peghead inlays were mostly intact. I only had to cut a couple of small pieces to replace the missing ones.

The fretboard inlays were all hand cut and inlaid into a new fretboard.

The inlay on the back of the headstock was intact. The tuners are all new modern replacements.

I had to hand shape the heel of the neck to fit the curvature of the body and to create the proper neck angle. The carving was all original, and the neck was in very good shape, so I didn't have to re-create the inticate carving on the heel.

A view of the maple/ebony dowel stick I created to closely match a photograph I had of another Orpheum from the same era.

Most of the hardware is new reproduction hardware, but I found an old armrest and a vintage neck/rim bracket that were closer to the originals than the modern repros.


Wednesday, July 4, 2012

Stretching The Head

The brackets, hooks and tone ring have all been attached to the finished rim.

The calfskin head has been soaked in water and is now damp and pliable. The hoop is placed in the center.

 The head is draped over the banjo rim assembly, and a magic wand is waved over it.
 VOILA! A real live banjo!


OK... here are the "behind the scenes" steps:
 The head is folded toward the center and the tension hoop is placed over the outer edge.

 The hide is pulled up between the tone ring and the tension hoop, carefully removing all wrinkles.

 As the head is stretched, I make sure it is pulled down evenly all the way around.

The excess is trimmed away after the head is almost dry, but still slightly soft. The head will shrink some as it dries, so I don't want it too tight to start. I'll tighten it over the next couple days and then it's ready to string up!

Sunday, June 24, 2012

Finishing The Orpheum

 Preparing the shellac for French polishing. Basically just alcohol and shellac flakes. TIP: Never mix your alcohols.

 I start with some thinned shellac with a little amber stain mixed in to give it some base color.

 Next I French polish using a little heavier shellac mix. I'm using medium amber shellac flakes so as I build the finish, the color starts getting a little deeper. French polishing uses a cotton ball dipped in the shellac mix, wrapped in a cotton cloth, and dabbed with a drop of olive oil so it will wipe on smooth. I slowly build up the finish with this technique.

 Once I have it built up to where I want it, I use a 400 grit sandpaper to level it all and remove the streaks from the wiping process.

Now I use a much thinner shellac mix for the top coats. There's no streaking with the thinner shellac, so there may just be some minimal light sanding followed by some polishing cloths, and it will be done. Once it's cured, it's as durable as modern lacquer finishes as long as you don't leave it in the sun or a hot car, or spill your whiskey on it. It's a difficult technique to master on larger instruments like guitars, but a banjo neck is not too bad

Sunday, June 17, 2012

Orpheum Update

 
 What is it?


 If you guessed a banjo neck-to-body alignment jig, you would have been correct. The square fence at a 45 degree angle keeps a circle perfectly centered.

 The jig holds the neck, dowel, and rim assembly in place while I square everything up.

 I check the fit of the neck heel against the body at the correct angle.

The proper angle of the neck ensures the string height at the bridge will be correct. Once everything is right
the dowel is glued into the neck.

Ready for final sanding and varnish.

 The neck is fretted, inlaid bound and ready for varnish.

Close-up of the intricate inlay.

Sunday, June 10, 2012

Classic F-5 Mandolin

I built this F-5 based on the classic features of the traditional F-5 mandolins, with a stunning one-piece curly maple back, gold-plated tuners, ivoroid bindings and sunburst color.

 My original inlay design. This one has fixed twin carbon fiber bars in the neck instead of an adjustable truss rod.

 Rosewood heelcap, ivoroid/black/white binding around the on-piece back.

I inlaid a little scroll to fill the space at the end of the fretboard rather than installing half frets.

Quilted F-5


I built this one for myself using all the design elements I love. My original "flower pot" inlay design, the vintage-look tuners, "tortoise shell" binding and block fretboard inlays.

 
Trimmed with a strip of white and then a strip of tortoise binding.
My original block inlay design is made of four pieces of mother-of-pearl with an abalone diamond in the center and a thin strip of black fiber separating them.

 Finished in clear gloss lacquer

Monday, June 4, 2012

Square Peg in a Round Hole

 The dowel stick fits into the heel of the neck and extends to the back of the rim, pulling the neck tight and straight against the banjo rim. The original Orpheum was ornate in every way, including the dowel, so I matched the design of it with multiple pieces of maple, ebony and thin black fiber stripes. The laminated dowel also makes a stronger piece that is less likely to warp or twist over time.
 The end is carved and filed until it fits tight into the drilled hole. It is critical that it is perfectly straight with the center line of the neck.
It is dry fit without glue until I true it up with the banjo rim, then it will be glued in place.