Monday, February 22, 2010

Neck and Body


The neck has been cut to shape, and the top has been glued to the body. The neck has an adjustable truss rod as well as two carbon fiber bars. It makes for a very straight, stiff neck, but still allows for slight adjustment if it is ever necessary.

The point protectors are made of maple with three thin wood fiber pieces for accent. The binding around the edge of the top and back will match the points.

The X-braces have been carved down and tap-tuned to D#. The back plate has been tuned to A#.

The fretboard has been profiled to shape and the slots have been cut.

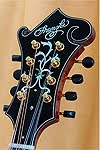
Now comes the decorative parts. Inlaying the peghead and fretboard, binding the body and inlaying the sound hole rosette.
Stay tuned.

Monday, February 15, 2010

Carving The Top Plate


I use a router mounted to a wide flat base that rests on a form to control the depth. Then I adjust the depth of the cut and make a series of rings forming a "topographical map."
Then using a couple of finger planes, I carve off the ridges and sand it smooth creating the final arched shape of the outside.
Then I flip it over and hand carve the inside to exact thicknesses.
This one will use an X-bracing system. Each spruce tone bar must be shaped to match the inside curve exactly.
I glue them into place using a "Go-Bar Deck," which uses flexible bars wedged against the top of the deck to provide pressure while the glue sets. It works great for gluing parts that are difficult for regular clamps.
I also use the Go-Bars to glue the top plate onto the rim assembly.

Wednesday, February 10, 2010

Bending the Sides and Assembling the Rim


The sides have been bent to shape using a "high-tech pressure steamer" (converted tea kettle with a gas-line hose and nozzle).The support blocks were then glued into place.

The kerfed linings are glued in next. These give the top and back plate more gluing surface than if they were just glued to the side ribs.

All the wood parts have been cut to size now. The top and back plates will be carved from the inside next and then the body will be ready for assembly.

The adjustable fixture will be left inside the rim assembly until the top plate is glued on, to maintain its shape. The equal pressure from the inside keeps it symmetric.

Tuesday, February 2, 2010


The neck block has been cut to rough profile and the channel for the re-enforcement rods has been routed. The headstock overlay has been thickness sanded and the fretboard has been cut and rounded to a 12" radius.

The sides have been bent to shape and clamped against a form until they are completely dry.

The body was carved to rough profile using a router. Each ring is routed in 1/32" increments.

Then using palm and thumb planes, the plate is carved to it's final shape.