Ooohh...shiny!
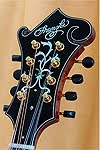
A close-up of the peghead.
That's a high-gloss finish!
The third and final buffing.
Changing pads for level 3 buffing compound. You must always use a dedicated pad for the different compounds or you will end up with scratches in the finish.
Charging the second buffing pad with level 2 compound.
After the first buffing, it looks quite a bit glossier. It will get glossier yet with two more buffs.
I use a power buffer spinning at 850 rpm with a coarse compound to buff out the fine scratches from the hand sanding. I keep the instrument moving with only slight pressure against the wheel to keep it from getting too hot and melting the lacquer.
After sanding the entire mandolin with 1000 grit, and 1500 grit papers, I used 1800, 2400, and 3200 grit Micro Mesh pads. Now the lacquer is perfectly smooth and flat and has a satin finish.