
I created the designs using a computer graphics program and printed it out using a laser printer. Then I cut out all the individual paper pieces and glued them to the Mother of Pearl blanks using plain white glue. This gives me a nice clean line to cut to.

After cutting all the pieces from the pearl with a jeweler's saw, I glued them to some poster board to keep everything together.


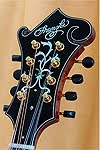
I use another printout of the design glued to the headstock, to rout out the inlay cavity with a Dremel tool. Using plain white glue, the paper design comes off the wood surface easily with warm water.

The small pieces are brittle and break easily. When this happens, it's best to cut another piece rather than try to glue it together.


After gluing the inlays in place, the small voids can be filled with wood dust from the routing process mixed with glue. After sanding the entire surface flush, any filled areas are nearly invisible. I try to rout the inlay area as close as possible, and use as little filler as necessary to give it a clean, sharp look. This also helps later during the finish process, as the clear finish will want to sink into the voids.
Spectacular!
ReplyDelete